
Attachment 17 : All Classes
Note: This is a list of the steps you must take with each computer. Anywhere along the way, you may need to replace parts or dig deeper to find the source of problems. The extra steps you take depend on the specific problem. [This Work Plan does not apply to classes One and Two where the computers are assembled and disassembled for the purpose of learning the components.]
This is a process to get to know one computer, its particular features, and write them down. You'll be filling out a standard TecsChange In-Process form to record what you learn. If there is a problem with your computer, or something unusual about it, write that down too!
- Computer Make/Model: for example, “Dell Optima 4/66”
- CPU Type/Speed : This may be on the outside or on the Sticker. If not you can get the information after you have booted the computer.
- TecsChange #: this is the number that is on the pre-numbered sticker.
- Student Name: that would be you!
A:>
Run CHKDSK and/or SCANDISK from the DOS Prompt. Check the hard drive for errors, particularly bad blocks or bad sectors.
(Some computers,
such as Compaq, may require a floppy disk to do Setup, or a special diagnostic
partition on the hard drive.)
If you miss hitting the key quickly enough to get into setup just start
the computer again, with CTRL-ALT-DEL or by using the RESET button if there
is one.
All setup programs
are different and supply different information. You need to read the instructions
at the bottom, plus the help (usually on the right side of the screen),
and the menus to determine where to find information.
Glossary
of Terms
Binary
A
number system that has just two unique digits. For most purposes, we use the
decimal number system, which has ten unique digits, 0 through 9. Computers use
the binary number system, which only has two unique numbers, 0 and 1. We use
the decimal system in everyday life because it seems more natural (we have ten
fingers and ten toes). For the computer, the binary system makes sense because
it's electrical: things are either "on" or "off."
Bit
Short
for binary digit, the smallest unit of information on a machine. A single bit
can hold only one of two values: 0 or 1. Since one bit can’t give you very much
information, 8 bits in a row make a byte, which can keep track of 256 values.
Byte
A
byte is equal to 8 bits. Large amounts of memory are talked about in kilobytes
(1,024 bytes), megabytes (1,048,576 bytes), and gigabytes (1,073,741,824 bytes).
A disk that can hold 1.44 megabytes, for example, is capable of storing approximately
1.4 million characters, or about 3,000 pages of information.
Megabyte / Gigabyte
When used to described data
storage, 1,048,576 (which is 2 to the 20th power) bytes (one million bytes).
Megabyte is often shortened to M or MB. When
used to describe data transfer rates, as in MBps (megabytes per second). To
give you an idea, one megabyte is enough to save all the words from an entire
Boston Sunday Globe. Gigabyte is often
shortened to Gig or GB and is equal to 1,073,741,824 (which is 2 to the 30th
power) bytes (one billion bytes).
DOS
Disk
Operating System. The operating system
first created for IBM Computers. The
one we use today is MS DOS. Or Microsoft
DOS. PC DOS was created for the first
IBM PCs.
Data
Information
usually formatted in a special way. Software can be one of two kinds: data and
programs. Programs are a set of instructions for reading or using data. Data can exist in many different forms—as numbers
or text on pieces of paper, as bits and bytes stored in electronic memory, or
even as facts stored in a person’s mind. "Data" usually means information that a computer uses,
as opposed to information that people can read.
A
machine that reads data from and writes data onto a disk. A disk drive is somewhat similar to a record
player: it spins the disk around, and the heads are attached to an arm that
moves from the edge of the disk towards the center (just like the needle on
a record player). (Moving the head between the center and the edge of the disk
is call “seeking” and causes most of the noise you hear from a disk drive.)
It has one or more heads that read and write data.
Unlike
most hard disks, floppy disks (often called “floppies” or sometimes “diskettes”)
are portable, because you can remove them from a disk drive. Disk drives for
floppy disks are called “floppy disk drives” (or sometimes just “floppy drives”).
Floppy disks are slower to access than hard disks and have less storage capacity,
but they are much less expensive. Most important, you can take them out and
put them in another floppy disk drive, so you can copy files from one computer
to another
A
hard disk or hard drive is a magnetic disk on which you can store computer data.
Hard disks hold more data and are faster than floppy disks. A hard disk, for
example, can store anywhere from a few megabytes to several gigabytes, whereas
most floppies have a maximum storage capacity of 1.44 megabytes.
(verb) To divide memory or mass
storage into isolated sections. In DOS systems, you can partition a disk, and
each partition will behave like a separate disk drive. Partitioning is particularly
useful if you run more than one operating system. In addition, partitioning
on DOS and Windows machines can improve disk efficiency. This is because the
FAT system used by these operating systems automatically assigns cluster size
based on the disk size: the larger the disk, the larger the cluster. Unfortunately,
large clusters can result in a wasted disk space.
File allocation table
(FAT)
A table
that the operating system uses to locate files on a disk. Because of fragmentation,
usually files are saved in many small “clusters” (sections) that are scattered
around the disk. The FAT keeps track of all these pieces. In DOS systems, FATs
are stored in hidden files, called FAT files. (Hidden files don’t show up when
you enter the DIR command or when you are using File Manager in Windows.) The
FAT is usually stored at the beginning of the drive. It lists the names, types,
sizes, dates of all the files and the clusters on the disk that store the data
in the files.
FDISK
By
using DOS’s Fdisk utility program (FDISK.EXE), a physical drive can be split
into one or more partitions (or volumes). DOS supports up to four partitions
on a hard drive. Each partition has
a drive name (a single letter, like “C:”) and has a file allocation table. When
you format a hard drive, DOS divides it into sectors (each one holds 512 bytes
of data). A group of sectors is a “cluster.” A cluster is the smallest amount
of disk space that can be used for files.
Format
To
prepare a disk, for reading and writing. When you format a disk, the operating
system erases all bookkeeping information on the disk (the names and locations
of files, for example). It also tests the disk to make sure all sectors are
good, marks bad sectors (ones with scratches), and creates internal address
tables that it later uses to locate information. You must format a disk before
you can use it.
Note
that reformatting a disk does not erase the data on the disk, only the address
tables. Do not panic, therefore, if you accidentally reformat a disk that has
useful data. A computer specialist should be able to recover most, if not all,
of the information on the disk. You can also buy programs that enable you to
recover a disk yourself.
Fragmentation
Fragmentation
is when a disk has files that are split up into pieces scattered around the
disk. Fragmentation occurs naturally when you use a disk frequently, creating,
deleting, and modifying files. At some point, a file becomes too large for the
space originally allotted for it, so the operating system splits the file into
two or more chunks. This is entirely invisible to people using the computer,
but it can slow down how fast the computer can read and write data to and from
a disk. The more fragmented a disk is, the more the disk drive has to search
through different parts of the disk to read a single file. In DOS, you can “defragment” a disk with the
DEFRAG command. You can also buy software utilities, called “disk optimizers”
or “defragmenters,” that defragment disks.
Memory
Basically,
“memory” means the storage areas inside the computer for data. Memory usually
means storage that saves data on chips. (“Storage” or “mass storage” means tapes
or disks.) In addition, the term memory is usually means physical memory: the
actual chips that hold data. Some computers also use virtual memory, which expands
physical memory onto a hard disk. Every
computer comes with a certain amount of physical memory, usually referred to
as main memory or RAM.
There
are several different types of memory:
RAM
(random-access memory): This is the same as main memory. When used by itself,
the term RAM refers to read and write memory—that is, you can both write data
into RAM and read data from RAM. This is in contrast to ROM, which permits you
only to read data. Most RAM is volatile, which means that it requires a steady
flow of electricity to maintain its contents. Whenever the power is turned off,
all data that’s stored in RAM disappears and is lost.
RAM =
Random Access Memory = Extended, or temporary, memory
ź usually measured as 1 Mb, 4 Mb, 8 Mb, 16 Mb,
32 Mb, or 64 Mb
ź comes in different types, according to speed
DRAM = 80 nanoseconds (ns)
EDO = 70 ns
SDRAM = 60 ns
So, SDRAM is the fastest because it
takes the shortest amount of time.
ROM = Read-only memory, or ROM, is a type of memory that can permanently or semi-permanently hold data. It is called read-only because it is either impossible or difficult to write to. ROM is also referred to as nonvolatile memory because any data stored in ROM remains there, even if the power is turned off. As such, ROM is an ideal place to put the PC's startup instructions - that is the software that boots the system.
ScanDisk
A
DOS and Windows utility program that
finds and corrects errors on hard disks. ScanDisk
checks the disk platters for defects and looks for lost clusters. Sometimes
clusters are lost when a program “freezes” or “aborts” (the program stops responding
or shuts down suddenly by itself). This happens because the program is writing
information to a file on the disk, but it’s interrupted, and never has a chance
to “close” the file.
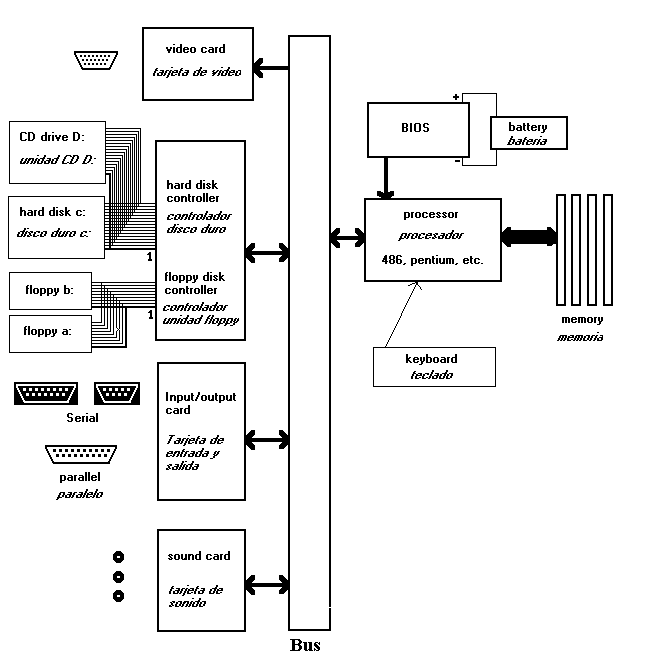
Computer
A
computer is an apparatus built to perform routine calculations with speed, reliability,
and ease. While many parts go into a computer, some parts are
more fundamental to the computer’s actual operation. These parts include:
· MOTHERBOARD & CPU (Central Processing
Unit):
The motherboard and CPU are like the nervous system
of the computer. While the CPU is like
a brain, the motherboard is like the spinal cord with nerves going out to all
parts of the computer. The CPU is responsible
for processing all of the info passing through your computer. Its main characteristic is speed. The motherboard is the large board in your
computer covered with teeny tiny wires and transistors that connect every piece
of hardware to the CPU.
· BIOS (Basic
Input Output System):
The BIOS is responsible for monitoring the kinds of
hardware that are currently installed in your computer. It works with the CMOS Setup Program to keep
track of new parts, missing parts, and broken parts.
· BUS:
The “bus” is a common pathway across which data can
travel within a computer. This pathway
is used for communication and can be established between two or more computer
elements. The term bus slots refer to
the long, thin slots on the motherboard where various cards are plugged in.
There are 2 types of bus slots: full slots and half slots. The full slots (ISA – Industry Standard Architecture)
are longer. The half slots (PCI – Peripheral Component Interconnect) are shorter.
All slots of a particular length are wired identically, so a card can
go into any of the slots.
· RAM (Random
Access Memory):
RAM is a type of memory that allows you to run several
different programs at once. For instance,
if you wanted to run a word-processing program and play a game at the same time,
it is your RAM that provides the space to do this. RAM operates by providing temporary space onto
which your computer can store stuff that it’s currently working on but not necessarily
saving. RAM is sort of like scrap paper.
It gets filled up with stuff you’re currently working on, but NOT stuff
you’re going to save. So, RAM gives you space to scribble lots of
things at the same time. And just like
scrap paper gets thrown away, RAM gets erased whenever you turn off your computer
or close your programs.
· HARD DISK
DRIVE (HDD):
Using a magnet to transfer data bits, the hard disk
drive can provide long-term storage of information you want to save. That way,
whenever you need a copy of it, you can simply access it on the hard disk drive.
Hard disk drives are not portable, in the sense that if you want to save
something to use later on a different computer, you should not save it on your
hard disk drive. Rather, you should consider your floppy disk
drive.
· FLOPPY
DISK DRIVE:
The floppy disk drive works exactly like a hard disk
drive, except it saves information onto small, portable disks. Unlike a hard disk drive, however, a floppy
disk drive saves information onto a portable disk, so you can access the information
from ANY computer that will read your disk.
· CD-ROM
(and CD-R/CD-RW drives)
CD ROM Drives use laser to transfer data to and from
the CD. Most are CD Rom and can only
be read. There are special drives which
can also write to a special CD for recording. Most software is installed from a CD Rom Drive today.
·
INPUT/OUTPUT DEVICES:
Your monitor and video card provide one of the more
obvious forms of input and output. The
video card accepts input information from the motherboard and transmits this
data into a picture on your monitor screen.
The picture is a type of output
Each device provides one of the most direct ways for
you to give commands and information to the computer. By typing or clicking, you give instructions
(or input) to the computer that will respond to your instructions and create
a result (output).
These ports provide places to plug a variety of input
and output devices into your computer. This
isn’t necessarily true. The older Serial
ports are the same size as Parallel. New Serial Ports (Universial Serial Bus - USB) are smaller and faster
than Parallel. Serial ports are physically
smaller than parallel ports. Serial
ports, therefore, tend to move information more slowly than do parallel ports.
However, both are convenient and useful.
Some examples of hardware that uses these ports include your mouse (serial
port), printers (parallel ports), and gaming accessories like joysticks (serial
ports).
A printer is an example of an output device that connects
to your computer
· POWER
SUPPLY:
Step
I.
Answer
the following questions about your PC:
Computer
Brand and model:(Compaq, Dell, IBM, etc) __________
1.
Processor
a) type (486, Pentium)
__________
b) speed (megahertz) __________
2.
BIOS
a) Brand __________
b) Version __________
c) Date __________
3.
Memory: SIMM or DIMM?
a) 72-pin or 168-pin? __________
b) How many in there now? __________
4.
Power Supply
a) How many watts? __________
b) How many disk drive connectors?
__________
5.
Bus Slots
a) How many (ISA) full slots? __________
b) How many (PCI) half slots? __________
6.
Floppy drives
a) What size (3.5” or 5.25”)? __________
b) How many floppy drives are there? __________
7.
CD ROM
a) What speed? __________
Step
II.
Label
the following parts in your PC:
1.
Processor
2.
BIOS
3.
Hard disk data cable (put sticker next to pin 1)
4.
Floppy disk data cable (put sticker next to pin 1)
5. Video port
6. Mouse port
7.
Serial (COM) port
8.
Parallel (LPT or printer) port
9.
Keyboard port
10.
Battery
11.
Bus Slots (note if ISA or PCI)
12.
Power supply
13.
Floppy Drive
14.
Power Cables (note HD, Floppy Drive, etc)
15.
Hard Disk Drive
16.
Memory Module
17.
Video Card
18.
CD-ROM Drive
19.
Modem
20.
Network Interface Card (NIC)
21.
Sound Card
Attachment
Four - Classes 1& 2
DISK DRIVE CABLES
& MEMORY TYPES
DISK DRIVE
CABLES
and other wires inside a
computer
The flat cable with 34 wires that plugs into the motherboard goes to the floppy drive. There is a twist in the cable toward the end. A drive that plugs in after the twist becomes an A: drive. If a drive is connected before the twist, it will function as a B: drive. Some cables have two different types of connectors -- just use the type that matches the drive that you are trying to connect.
The wider flat cable with 40 wires and no twist goes to the hard drive and the CD-ROM. This is the IDE (also called E-IDE or ATA) cable. Usually, two of this kind of cable can plug into the motherboard, called Primary Channel and Secondary Channel. Usually the main hard drive is set up on the Primary channel as the first device, called Master. A CD-ROM can be on the same cable as a second device, called Slave, or on a separate Secondary cable, either as Master or Slave. All IDE devices have three jumper settings, next to the cable connection, labeled Master, Slave, and Cable Select. If there is only one device on an IDE channel, sometimes it is called Single instead of Master, and sometimes there is a separate jumper setting for this situation. Hard drives should never be set to Slave without a Master device present on the same channel, but it is sometimes OK to set up CD-ROM drives that way.
All drives also have a four-pin power connection. Sometimes the connections have to be wiggled gently but firmly to seat them properly, or unplug them. Most connections use some special shape or trick to keep you from plugging them in backwards -- examine each one carefully to understand how they work. Never change any computer connections with the power on! If you are nervous, make sure the power is unplugged before you work inside the computer. It is also best to settle yourself down and then touch the metal computer case before touching the electronics inside, to avoid damage from static electricity. This is a special concern in the winter, when the air is dry.
Flat cables have a stripe on one edge, marking the pin-one edge of the double-row header connector.
CD-ROM drives have a place to connect a special audio cable, which goes to the sound card. This is a nice extra feature, but not necessary for most uses.
If there is a wider 50-wire cable, that is for a special kind of drive called SCSI.
There are power wires from the power supply to the motherboard, usually two connectors - put the black wires together when you plug them in. There is also often a power wire from the power supply to the ON/OFF switch on the front panel. The connections to this switch may expose 120 volts of line current - this is the most dangerous place to touch in the computer - you could get a bad shock! Stay away from touching behind the power switch unless you are sure the power is unplugged.
There are usually many other little wires, that go to the fans, speakers, and lights and switches on the front panel. Every computer is different, and the best way to know how to connect them is to look at another of the same kind. Also, there is usually tiny lettering on the motherboard to let you know what should be plugged in there. Whenever you turn on a computer with the cover off, check to make sure that all fans are turning. If they aren't, find out why --or something may overheat and burn up.
===============
MEMORY TYPES
Modern computer memory comes on plug-in flat sticks of various kinds. Only use the kind of memory that the computer has proper slots for. Each kind takes some experience to feel comfortable with, and some practice to get the feel of putting it in and taking it out. It is important to arrange a good workspace with good access to the memory slots in the computer, and good lighting, so you can see and understand what you are doing, especially for your first experiences. Some kinds of memory in certain computers can be a real bear to get in properly!
Older 286, 386, and 486 computers used 30-pin SIMMs (Single Inline Memory Modules). The fastest versions were 70 and 60 nS (nano-seconds, billionths of a second). The biggest sizes in ordinary use were 1M (megabyte) and 4M per stick, and were usually used in sets of four. Most computers had eight slots.
486 and Pentium
computers used 72-pin SIMMs. Again, the fastest ordinary speeds were 70 and
60 nS. The most common sizes are 4M and 16M sticks. 8M sticks are also frequent,
but can be harder to use in older computers. Many computers require matched
pairs. Four slots are most common. Many computers also have some memory built
in to the motherboard, usually 4M or 8M.
Often, if the computer has no memory installed, or there is a problem with the
memory, the computer will make a special pattern of beeps when it is turned
on.
Pentium and later computers use 168-pin 3.3V DIMMs. There are usually just a few slots, and single sticks can be used by themselves. Common sizes are 16M, 64M, and 128M. This is the best kind of memory today, very cheap. Some older computers won't be able to use properly sticks that have too much memory on them.
CHECKIT
· SYSINFO: (for System Information) Use
this menu to get information about what kinds of hardware are in the computer. This information is referred to as the computer’s
configuration. This menu also allows
you to see what information about the hardware is contained in the CMOS.
(See CMOS page for more information)
Because of the age of the program, it will not be able to submit accurate
information about the new computers.
· BENCHMARKS: This menu has tests that measure how fast your
computer runs. However, this test
is pretty old and, therefore, not very useful.
· TOOLS: DO NOT GO THERE!
Tests on this menu are from the old days, and can permanently damage
the hard disk drive!! These tests can also mess up the computer's memory!
· SETUP: The options in this menu
affect how CheckIt, itself, looks and tell CheckIt where to store reports
from its tests.
· EXIT: This ends CheckIt and takes
you back to the DOS prompt.
· TESTS: This menu contains all of the tests that we will be using. Due to
age of the CheckIt program, not all of the tests are useful on the newer computers.
For example, we do not use the following tests:
Memory and Hard Disk. Most
of these tests are pretty slow, so get ready to be VERY patient! :
· Hard Disk: We do not use this test to check the hard drives
in the computers that we have. If
we did the process would be as follows. pick “Drive 0” for the C: drive. There are four parts to this test:
1. Controller Diagnostics: Tests
to see if the computer’s controller card for the disk drives is operating
properly.
2.
Linear Test: Tests to see if every single spot (called a “location”)
on the hard disk can be located and if data can be read.
3.
Butterfly Test: Tests how quickly the read/write heads can alternate
between a spot at the beginning of the hard disk and a spot at the end.
4.
Random Test: Tests to make sure the read/write heads can alternate
between random spots, with no pattern to guide the heads.
· Floppy Disk: For this test, first select a floppy drive to
test, either the A: drive or (Drive 0) or the B: drive (Drive 1). Next, get a “scratch disk” (a practice disk
containing no valuable information) from the equipment cart. CheckIt will then ask you to insert a disk
into the floppy drive to test out the drive.
At this time, it is EXTREMELY
IMPORTANT that you TAKE OUT THE CHECKIT DISK and INSERT THE SCRATCH DISK. (If you run this test using the CheckIt
disk, the computer will erase all of the information and programs on the CheckIt
disk.) To begin the test, press Y
and the Enter key.
· Serial Ports: Before you can run this test, you need to get
a “serial loopback connector” from the equipment cart. Next, begin by choosing “COM1” from the test
menu. Then, connect the loopback connector
to the serial port, press Y and the enter key, and the test will begin.
Some computers may have more than one serial port, and if yours does,
then you should check out each port, individually.
· Parallel Ports: Before you can run this test, you need to get
a “parallel loopback connector” from the equipment cart. Next begin by choosing “LPT1” from the test
menu. Then, connect loopback connector
to the parallel port, press Y and the Enter key, and the test will begin. Some computers may have more than one parallel
port, and if yours does, then you should check each port, individually.
· Video Tests: This test involves
several phases. The first few phases
check the video memory (a special type of memory that is on the video care
and is separate from the regular memory) and will give you error messages
if the memory fails at all. The remaining
tests put patterns on the screen to test color, brightness, contrast, and
other video characteristics. All you
have to do during these tests is look at the screen and make sure that the
picture looks like what the computer says it should look like. At the end, the program will give you a list
of which video tests passed and which ones failed.
ScanDisk
Your
hard drive is probably the single most important piece of equipment in your
computer. Besides having command over your valuable data, it is because of
the hard drive we are able to run modern software at all! But, for all of
their importance, few of us perform the maintenance they need. ScanDisk is
a utility that can remedy this situation.
ScanDisk
is a software utility included with Microsoft's DOS operating system since
its 6.2 release and included as a System Tool in Windows® '95. The utility
"scans" a drive's integrity, checking both the file structure and
the media surface. Basically, it verifies the accuracy of the hard drive's
"table of contents" (called the File Allocation Table or FAT) and
makes sure the hard drive's disk surfaces are suitable to reliably hold data
(it will mark suspicious areas as being "bad"). On the occasion
it does find a bad area (a cluster), the program will attempt to salvage the
data saved there. The most common errors encountered are "lost clusters"
or "cross-linked files". Unfortunately, the chances of recovered
data being meaningful is low (sometimes text files can be pieced back together),
but at least by deleting the recovered data, you can free up otherwise "used"
disk space. When run on a regular basis, ScanDisk can repair many of the errors
it finds, and prevent some complications from compounding.
DOS
6.2/Windows 3.1x Systems
At
a DOS prompt, type SCANDISK. This process has two parts. The first checks
files structure, the second completes the surface scan. You will have an opportunity
to complete part one and skip part two, or allow for a full scan.
Note:
If you want to check a floppy or any other removable media type, include its
drive designation in the command (i.e. SCANDISK A: or SCANDISK B:).
Windows
'95
The
Windows '95 version of ScanDisk is quite automated. You will be able to access
it directly from within Windows under Programs |Accessories | System Tools.
Although it can run "in the background," it is suggested that you
close all applications before starting the ScanDisk process. You can scan
any drive on your system with either a quick check or a full surface scan
or both.
ScanDisk
is preventative medicine. Once a file has become corrupted, "Composer
error, cannot read from drive c:” its hands are tied. You'll need a more powerful
utility or the resolve to recreate the job you just lost. You should use ScanDisk
regularly, Checking File Structure once a week and completing a full surface
scan perhaps once a month. Either way, you'll be on your way to a healthier
hard drive!
When
you turn on your computer, it first performs a Power-On Self Test (POST),
which includes checking how much memory there is and whether this memory is
in working condition. The test then checks other hardware to make sure all
of the parts work correctly. Specifically, the test examines the kind of floppy
disk drive, hard disk, and video card located inside the computer.
How does CMOS remember key information when the computer is turned off and
not receiving any electricity? There is a small battery inside for this. The
battery also keeps the computer's internal clock going: that's why your computer
should always know the correct date and time. If your computer does not show
the correct date and time, that's a good sign that the battery is low or dead.
(If the time is about right, but the date is way wrong, it may just need your
help to enter the new millennium - set it to 2001!)
Whenever the
battery has problems or the hardware in the computer changes, you should run
CMOS/BIOS Setup Program and check the information stored in CMOS to make sure
it correctly documents all of the hardware currently inside the computer.
Some computers check these settings automatically (or "auto-detect"),
but the ability to check automatically depends on what type of setup program
the computer uses. (If the battery needs replacing, the computer cannot be
set up successfully until that is taken care of.)
The
CMOS/BIOS Setup Program is already installed on your computer. All you have to do to run this program is press
a certain key or group of keys while the computer is booting up.
Exactly
what key should you press? It’s often
a different key for different computers, and there’s usually no way to tell
before you turn the computer on. If
you look carefully, it will probably tell you what key (s) to press to get
into the setup program. Typically,
you just have to try a few common keys and see which one works.
Common
Keys and Groups of Keys to try:
·
Press the DELETE (Del) key
·
Press the F2 key
·
Press the CONTROL (Ctrl) key + ALT key + “S” key,
all at the same time
·
Press the CONTROL (Ctrl) key + ALT key + ESC key,
all at the same time
·
Press the F10 key (for Compaq Computers)
·
Some Compaqs require booting from a floppy with their
setup utilities.
The
CMOS/BIOS Setup Program contains much information, but we concentrate on 3
items:
1. Memory
When
you turn on the computer, it checks by itself to see how much memory it finds
available. Then your computer will
see how much memory CMOS says is available.
If your computer and CMOS find the same amount of memory available,
then the computer will continue booting up.
If the computer and CMOS disagree about how much memory is available,
this means the CMOS record needs to be updated.
Usually the amount of memory found by your computer is the correct
amount. When CMOS disagrees, your
computer screen will say something like:
Memory size mismatch - please run setup.
This
means that your computer recognizes the disagreement and wants you to run
the CMOS Setup Program to correct the error.
As soon as the CMOS Setup Program starts, it will change its setting
to match the computer setting. For
example, when you add or remove memory from the computer, CMOS does not recognize
by itself that you have done this. You
have to make sure it recognizes the change.
2.
Floppy Disk Drives
We
use only newer disks. These can hold
1.44 MB (megabytes) on a 3 1/2-inch disk.
Because the newer disks can store more information, they are sometimes
referred to “higher density” disks. The
CMOS Setup Program can help you check that the computer recognizes which size
drive you have installed into your computer.
3. Hard Disk Drives
Setting up a hard disk drive is a little more complicated on some older computers. When you install a new hard disk drive, you must use the Setup program to make sure computer knows these 3 things about the hard disk:
Most computers can auto-detect these settings. Modern BIOS will automatically detect a new Hard Drive in your computer and tell the computer what it is, set it up properly. When you enter the Setup program, look for an item called "Auto-detect Hard Disk." When you choose this item, the Setup program will check the hard disk and display the number of cylinders, heads and sectors.
These numbers are
often written on the outside of the hard disk. If the Hard Drive doesn't list
the capacity on the outside, you should label it and mark the capacity. (Masking
tape is handy for labeling, and Staples brand is good because it sticks OK but
does not leave a gummy mess when you take it off.)
· Many important functions are controlled by
the BIOS, for example:
1.
Sets the video mode.
2.
Determines the type and location of the cursor.
3.
Reads and writes screen information.
4.
Reads from or writes to a disk drive.
5.
Communicates with other computers through a modem.
6.
Sends a document to a printer.
·
· POST checks the motherboard components, reads
configuration data from the motherboard, and tests any hardware connected
to the computer through expansion slots.
Specifically, POST checks:
1.
CPU
2.
RAM (Random Access Memory)
3.
BIOS routines
4.
Serial and Parallel Ports
5.
Keyboard Controller (you’ll
see the keyboard lights flash briefly)
6.
Video Controller
7.
Mouse
8.
Floppy Disk Drive (you’ll see
its light flash briefly)
9.
Hard Disk Drive
· If everything is fine, the computer goes through a standard booting-up cycle and will beep once. If POST discovers a problem, it lets you know through several beeps, system failure messages, and boot-up failure messages.
Some
people confuse BIOS with CMOS RAM in a system.
This confusion is aided by the fact that the Setup program in the BIOS
is used to set and store the configuration settings in the CMOS RAM. The BIOS is the system software (or drivers),
which programs the CMOS RAM (hardware), like Window or DOS is the system software
that programs your computer.
When
you enter your CMOS/BIOS Setup, configure your hard disk parameters or other
BIOS settings, and save them, these settings are written to the storage area
in the CMOS RAM chip. Every time your
system boots up, it reads the parameters stored in the CMOS RAM chip to determine
how the system should be configured. A
relationship exists between the BIOS and the CMOS RAM, but they are two distinctly
different parts of the system.
Read-only
memory, or ROM, is a type of memory that can permanently or semi-permanently
hold data. It is called read-only
because it is either impossible or difficult to write to. ROM is also referred to as nonvolatile memory because any data stored
in ROM remains there, even if the power is turned off. As such, ROM is an ideal place to put the PC’s
startup instructions – that is the software that boots the system.
The
main ROM BIOS is contained in a ROM chip on the motherboard, but there are
also adapter cards with ROMs on them as well.
The motherboard ROM normally contains four main programs, including
the following in most systems:
·
POST (power on self test).
A series of test routines that ensure the system components are operating
properly.
·
CMOS Setup. A
menu-driven application that allows the user to set system configuration parameters,
options, security settings, and preferences.
·
Bootstrap Loader.
The routine that first scans the floppy drive and then the hard disk,
looking for an operating system to load.
·
BIOS (basic input/output system). A series of device driver programs to present a standard interface
to the basic system hardware, especially hardware that must be active during
the boot process.
The
Basics
Directory: A
directory is a place to hold files. A directory can have other directories
inside of it.
Files: A
file is data, or information. A file can be a document, a program or application,
or a number of other things saved on a disk. It can even be a text file you
typed up, to a graphic or picture that you created, Filenames have 8 letters,
a period, then 3 letters; the first 8 letters are its name, the last three
are called the “ extension.” For example, a program file usually ends in the
extension “.EXE”
DOS
Prompt: The
DOS Prompt looks like this:
C:\>_
The
little line at the end of it that flashes is the Cursor. This is the "place"
where you will start in DOS.
Commands:
cd: Short for "change directory." cd..
brings you to the top of the drive. "cd \windows" would bring you
to the c:\windows directory.
copy: Allows you to copy files; requires you to tell
it where from and where to. For instance, copy config.sys c:\windows\config.sys
will copy the file config.sys from the
directory the computer is looking at to the C:\windows directory. Copy config.sys config.bak would copy
the file config.sys to config.bak in the same directory; this is useful if
you want to edit a file and want to save a copy prior to working on it.
Ren: Renames a file. ren config.bak config.sys would rename config.bak to config.sys
Del: Deletes a file. del config.bak would delete the file config.bak)
Mkdir,
Rmdir: Creates and deletes directories. Mkdir
temp would create a directory called "temp" in your current
directory. Rmdir
temp would
delete that directory-but only if it is already empty of files and directories.
Move: Allows you to move a file from one directory
to another.
Advanced Commands:
fdisk: This command allows you to partition
physical disks, and gives it a drive letter, like “C:”. All data will be lost
if you make an changes with this program, so be careful.
format: This command prepares a disk drive for
use. May be used to erase an old disk or format a new one. Format c: \s makes
the C: drive bootable. Format c: \s \q would do this without checking to make
sure the disk is not damaged. (Note: \q should only be used if you are sure
that the disk is physically okay.)
chkdsk: This command checks the disk for problems
in directories and files. If you are having strange problems reading some
files from a disk, this may help.
scandisk: A newer, more thorough and powerful program,
but similar to Chkdsk. This is only available with DOS 6.0 or higher,
edit:
Allows
you to create and edit files.
exit: Sends
you to windows in DOS 6.0 and higher if you have windows installed.
mem
/c /p Shows the memory in your computer and the
allocation of programs in memory. The forward slash is used before entering
options
/?: Try using each of these commands
with /?. This will give you help for the options
available for a command. You can use
the /? with any DOS command.
mem
/?
doskey
/? (this one is fun. It lets you remember what commands you’ve typed
in previously)
attrib /?
dir /?
xcopy /?
Name 5 files in the c-drive:
Create a directory called “test”
Create a subdirectory of “test”
called “another”
Create a new file in “test”
using Edit
Copy the the new file into the
“another” directory.
Draw a directory tree to represent
the contents of the c-drive:
Delete the copied file.
Remove the “test” and “another”
directories.
Run chkdsk
Format a diskette
Take the disk out and then re-boot
the machine
WHAT HAPPENED TO THE "INFORMATION SUPERHIGHWAY"?
By Norman
Solomon / Creators Syndicate
A few numbers
tell a dramatic story about extreme changes in media fascination with the
Internet.
After the 1990s ended, I set out to
gauge how news coverage of cyberspace shifted during the last half of the
decade. The comprehensive Nexis database yielded some revealing statistics:
*
In 1995, media outlets were transfixed with the Internet as an amazing
source of knowledge. Major newspapers in the United States and abroad referred
to the "information superhighway" in 4,562 stories. Meanwhile, during
the entire year, articles mentioned "e-commerce" or "electronic
commerce" only 915 times.
*
In 1996, coverage of the Internet as an "information superhighway"
fell to 2,370 stories in major newspapers, about half the previous year's
level. At the same time, coverage
of electronic commerce nearly doubled, with mentions in 1,662 articles.
*
For the first time, in 1997 the news media's emphasis on the Internet
mainly touted it as a commercial avenue. The quantity of articles in major
newspapers mentioning the "information superhighway" dropped sharply,
to just 1,314. Meanwhile, the references to e-commerce gained further momentum,
jumping to 2,812 articles.
*
In 1998, despite an enormous upsurge of people online, the concept
of an "information superhighway" appeared in only 945 articles in
major newspapers. Simultaneously, e-commerce became a media obsession, with
those newspapers referring to it in 6,403 articles.
*
In 1999, while Internet usage continued to grow by leaps and bounds,
the news media played down "information superhighway" imagery (with
a mere 842 mentions in major papers). But media mania for electronic commerce
exploded. Major newspapers mentioned e-commerce in 20,641 articles.
How
did America's most influential daily papers frame the potentialities of the
Internet? During the last five years of the 1990s, the annual number of Washington
Post articles mentioning the "information superhighway" went from
178 to 20, while such New York Times articles went from 100 to 17. But during
the same half decade, the yearly total of stories referring to electronic
commerce zoomed -- rising in the Post from 19 to 430 and in the Times from
52 to 731.
In other prominent American newspapers, the pattern
was similar. The Los Angeles Times stalled out on the "information superhighway,"
going from 192 stories in 1995 to a measly 33 in 1999; Chicago Tribune articles
went from 170 to 22. Meanwhile, the e-commerce bandwagon went into overdrive:
The LA Times accelerated from 24 to 1,243 stories per year. The Chicago Tribune
escalated from 8 to 486.
Five
years ago, there was tremendous enthusiasm for the emerging World Wide Web.
Talk about the information superhighway" evoked images of freewheeling,
wide-ranging exploration. The phrase suggested that the Web was primarily
a resource for learning and communication. Today, according to the prevalent
spin, the Web is best understood as a way to make and spend money.
The drastic shift in media coverage
mirrors the strip-malling of the Web by investors with deep pockets and neon
sensibilities. But mainstream news outlets have been prescriptive as well
as descriptive. They aren't merely reporting on the big-bucks transformation
of the Internet, they're also hyping it -- and often directly participating.
Many of the same mega-firms that dominate magazine racks and airwaves are
now dominating the Web with extensively promoted sites.
Yes, e-mail can be wonderful. Yes,
the Internet has proven invaluable for activists with high ideals and low
budgets. And yes, Web searches can locate a lot of information within seconds.
But let's get a grip on what has been happening to the World Wide Web overall.
The news media's recalibration of public
expectations for the Internet has occurred in tandem with the steady commercialization
of cyberspace. More and more, big money is weaving the Web, and the most heavily
trafficked websites reflect that reality. Almost all of the Web's largest-volume
sites are now owned by huge conglomerates. Even search-engine results are
increasingly skewed, with priority placements greased by behind-the-scenes
fees.
These days, "information superhighway"
sounds outmoded and vaguely quaint. The World Wide Web isn't supposed to make
sense nearly as much as it's supposed to make money. All glory to electronic
commerce! As Martha Stewart rejoiced in a December 1998 Newsweek essay: "The
Web gives us younger, more affluent buyers."
Establishing a pantheon of cyber-heroes,
media coverage has cast businessmen like Bill Gates, Jeff Bezos and Steve
Case as great visionaries. If your hopes for the communications future are
along the lines of Microsoft, Amazon.com and America Online, you'll be mighty
pleased.
_________________________________________________
Norman
Solomon is a syndicated columnist. His latest book is "The Habits of
Highly Deceptive Media."
CD-ROM DRIVES
Basic tips
for adding one to a modern computer
The most common kind of drive has an IDE ATAPI interface - similar to IDE
hard drives. This is the easiest kind to install in modern computers. Most
modern computers support two IDE channels (cables), Primary and Secondary,
which can each have two drives, called Master and Slave, for a total of four
possible devices. The simplest setup would be a hard drive as Primary Master
and a CD-ROM drive as Secondary Master. There is a small jumper on the CD
drive to set it to Master or Slave. (Some older hard drives may require special
jumper settings when sharing a channel with another drive. Also, if you are
going to put two drives on one channel, you may need to replace the IDE cable
with one that has more connectors.) For better performance, but the hard drive
on the Primary channel and the CD-ROM on the secondary channel.
Most
modern computers will automatically allow CD-ROM drives without requiring
any special BIOS configuration setting. The
typical appropriate setting is "AUTO".
Installing
a CD-ROM drive on a working Windows 95 or Windows 98 system is usually very
straightforward -- just mount it, connect it (with everything turned off!),
turn the computer on, and everything works together automatically. (Actually,
it's usually a better idea to connect the drive temporarily first, and see
if it works, before mounting it permanently.)
However,
installing Windows from a CD can be complicated, since the software is on
CD, and that software is needed to make the computer work with the CD drive. This is an example of a "bootstrap"
problem often encountered with computers. This specific problem is mostly encountered
with Windows 95, which only knows how to work with most CD drives after you
somehow get Windows installed! Fortunately,
you can boot from a Windows 98 boot floppy disk, and then install either Windows
95 or Windows 98. (It is generally
advisable, if you have enough space on the hard drive, to copy the CAB files
from the CD to the hard drive, and install Windows from the hard drive.
That way, whenever Windows wants another little installation file at
any time in the future, it can just get it right off the hard drive, instead
of demanding the original installation CD be re-inserted.)
Most CD drives
come with a special cable for connecting audio from the CD drive to a sound
card, but this is not required for normal operation. Most computer CD drives will also play regular
music CDs - you can usually just put them in and listen to them on headphones,
while using the rest of the computer for unrelated work. (This can be a good thing to know for checking
that the CD drive is basically working.)
MODEMS
Modems
are used to connect computers in the home or small businesses to the Internet,
for e-mail and access to the World Wide Web.
The word "modem" comes from MODulation-DEModulation: converting
simple electrical signals to complex frequencies for transmission over phone
lines.
The basic unit of information is the BIT, either a ZERO or a ONE.
Bits are organized into groups of 8 called BYTES. (A byte holds one character
of text, or encoded computer information.) Bytes can be transmitted locally
over parallel groups of 8 wires, such as from a parallel port to a printer.
For transmission over longer distances, it is only practical to use one wire,
so the eight bits have to be transmitted in sequence, one after the other,
in serial fashion. This is the way serial ports work.
When trying to send information over phone lines, there are many additional
complications. A fundamental one is that simple electrical signals cannot
be sent, but only various tones (frequencies) similar to the human voice (200-10,000
Hertz - cycles per second). This has been a difficult technical challenge.
The first modems were very slow. Some major standards over the last 3 decades
have been: 300, 1200, 2400, 9600, 14,400, 28,800, 33,600, 56K bps.
The technical term for measuring modem speed is "baud", but it is
preferable to use the simpler term "bps" (bits-per-second). Generally
there are about 10 bits per byte or character (due to some overhead to make
everything work). So these speeds correspond to about 30, 120, 240, 960, 1440,
2880, 3360, and 5600 cps (characters per second).
A plain page of text contains about 2000 characters, so modern speeds allow
sending a page or more a second.
Each advance in modem speed has been very expensive at first, usually costing
over $1,000. But now this segment of the industry is getting mature. Good
56K modems cost about $100, and usable cheap versions can cost as little as
$10-30 if you shop very carefully.
Each advance in modem speed has involved special "inventions" that
one company tries to own. But other companies find other ways to accomplish
the same things, and modems aren't much use if they cannot communicate with
each other, so soon they are standardized.
For modems slower than 56K, the key term to look for is "V.34".
For the 56K modems, the key term is "V.90".
(Future computer communications will use wireless, cable, or special phone
lines to go faster than 56K. Cable modems and DSL (Digital Subscriber Line)
connections from the phone company are more difficult and expensive to install,
and cost about $50/month, but they are about ten times as fast, are "always
on" and leave the phone line free for normal use. The increased expense
is appropriate when a group of computers on a Local Area Network can share
the one fast connection.)
Modems can be internal or external. Internal are generally preferable, because
they are cheaper and simpler, with fewer messy wires, but they do require
opening the computer to install them.
Installing internal modems can be complicated. Older ones have "jumpers"
which have to be set properly. Older computers require this kind. Newer modems
don't have jumpers, but are "Plug-and-Play" (PnP). This automatic
feature is nice when it works, but even more trouble when it doesn't. (Also,
you have to get the kind that matches the slots that you have available in
your computer, either ISA or PCI.)
Even worse, modern fast cheap modems save money by putting less circuitry
on the modem card, and use the whole computer to do some complicated communications
functions. This is called "WinModem" or "HSP" (Host Signal
Processing). It requires a fast computer, and is complicated to install and
get working. But if you don't have much money to spend, and only want to use
Windows 95/98, it's what you will probably end up with.
Every operating system has it's own ways of dealing with modems. DOS and Windows
3.1 are simple and direct, leaving the applications to deal with the modems
directly. Windows 95/98 tries to incorporate the modems into the operating
system by installing software "drivers", an extra step, but once
you get it to work, most applications will be able to use the modem in a standard
way.
WHAT
TO DO WITH A MODEM
More
and more of all human knowledge and communications will be over the Internet.
You usually have to put up with ads on the free services, and you must have
a somewhat modern computer, but they are very useful, especially for testing
modem connections. You can do some simpler testing with the HyperTerminal
accessory that comes with Windows. If you work with modems much, or want to
learn more about them, there is diagnostic software available.
FOR MORE INFORMATION ABOUT MODEMS
On the Web: modemfaq.home.att.net/faq_a.htm;
808hi.com (very in-depth)
News Groups: comp.dcom.modems,
alt.comp.dcom.modems
1. Boot the WINDOWS INSTALLATION disk.
2. Choose option (2) - Boot with CD-ROM support. Notice the drive letter assigned to the CD drive.
3. After it finds the CD drive, put the Windows CD in the drive. Do a DIR of the CD drive to make sure that it is working.
4. Run FDISK.
A:>FDISK
5. Choose "Yes" if it asks if you want Large Hard Drive support. Look at the existing partitions on the hard drive.
6. Figure out if you have any small "diagnostic" partitions (BIOS SETUP) that should be kept. This is particularly likely if you are working with a COMPAQ computer. (On the other hand, if you are using a new or "transplanted" hard drive, there is no need to worry about keeping this partition.) If you have one of these special partitions to keep, you will have to use FDISK to delete all of the other partitions. But in most cases, you can escape from FDISK and use this shortcut to completely erase the hard drive:
A:> WIPE 0 (Make very sure that you are really ready to do this!)
If this confuses you, see Attachment Fifteen. (It may confuse you more.)
7. Run FDISK again. Make one large primary partition covering the whole drive. (This will be the default.)
8. Reboot, choose (2) and run FORMAT (Again, think twice, take a deep breath, before proceeding with this command - always.):
A:>FORMAT C: /S
9. After FORMAT completes, make a directory:
A:> MKDIR C:\WIN95
10. Copy the cabinet files from the CD to this new directory on the hard drive:
A:> COPY D:\WIN95\*.* C:\WIN95
11. Delete a large file that is not needed:
A:> DEL C:\WIN95\WOWKIT.EXE
12. Change over to the hard drive:
A:> C:
13. Change to the new directory:
C:> CD \WIN95
14. Start the actual installation of Windows:
C:\WIN95> SETUP
15. Follow the directions. Good luck!
If your computer does not have a CD-ROM drive, you will have to use another
technique to get the cabinet files into the WIN95 directory on your hard drive.
Here are some alternatives for accomplishing this: attach a CD-ROM drive temporarily,
use LAPLINK to copy files from another computer, use a ZIP drive, or attach
a hard drive temporarily that contains the files.
(This way of
installing Windows is a little extra trouble, but definitely worth it! Otherwise,
any time you make a change in your Windows installation, you would have to
provide the original CD again.)
![]()
Copyright
©1997-2002 TecsChange. Permission is granted to use this material for
nonprofit purposes as long as this copyright notice appears in the text.